この記事シリーズでは、Unity公式が配布しているゲーム「2D Character」にWwiseでサウンドを組み込む方法を綴っています。
※当ブログではMacOS環境で作業を進めています。他OSを使用している場合は表示や操作方法に差異がある可能性があります。
はじめに
前回の記事ではWwiseでジャンプの効果音を鳴らす仕組みを作成しました。
今回はUnity側でWwiseのデータを取得し、再生するタイミングをプログラミングすることで、ジャンプ音が再生されるようにしたいと思います。
プログラミングといってもゲームの仕組みはすでに出来上がっているので、そこにちょこっと書き加えるだけです。ご安心ください。
※Unityの用語や操作をある程度理解している方向けです。
1.操作キャラにWwiseのコンポーネントを付ける
まずは操作キャラである「2DCharacter」にWwiseのデータを読み込むための3つのコンポーネントをつけます。「2DCharacter」を選択し、
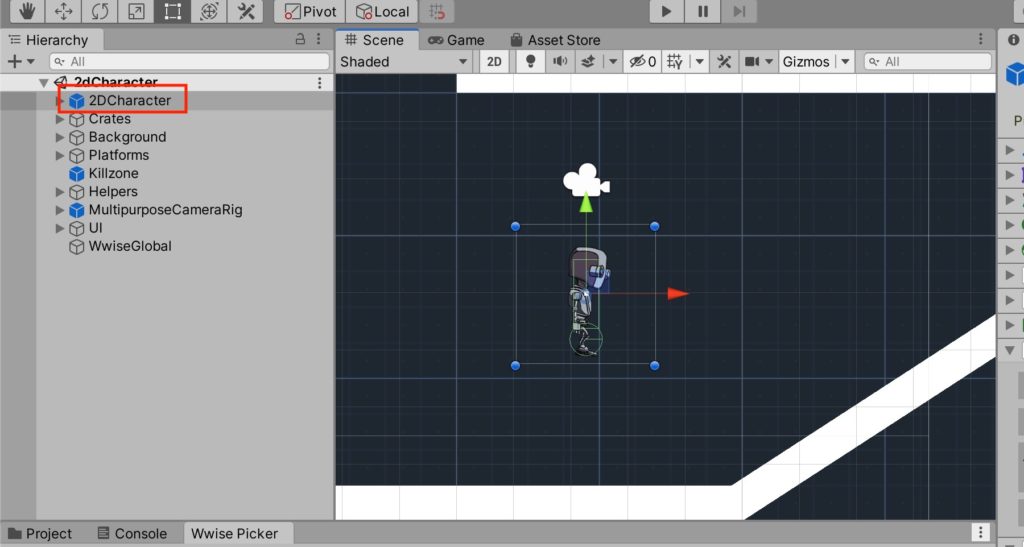
インスペクターのAdd Componentで「AkBank」、「AkGameObj」、「AkEvent」を追加します。
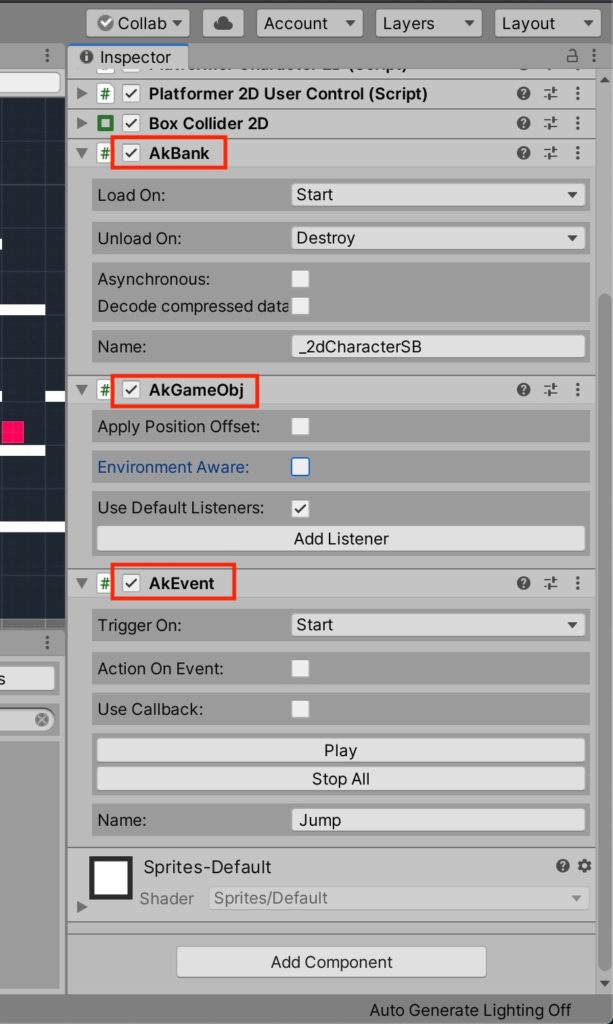
「AkBank」はサウンドバンクを読み込むためのコンポーネントです。Nameの項目に前回作成した「_2dCharacterSB」サウンドバンクを設定してください。
「AkGameObj」はオブジェクトの情報を受け取るためのコンポーネントです。おそらく「AkEvent」を追加した時に自動的に追加されてると思います。サウンドを再生するためのListenerもこれに含まれています。
「AkEvent」はEventの情報を受け取るためのコンポーネントです。Nameの項目に前回作成した「Jump」Eventを設定してください。
2.スクリプトにEventを発生させるコードを書き加える
このゲームはC#スクリプトでジャンプしたり、移動したりしています。
ですのでジャンプの動作を司る場所に、「Jump」Eventを発生させるコードを書き加えれば、ジャンプするタイミングで効果音が再生されるようになります。
で、そのジャンプの動作を司る場所がこちらの「Platformer Character 2D」というスクリプトをダブルクリックして開き
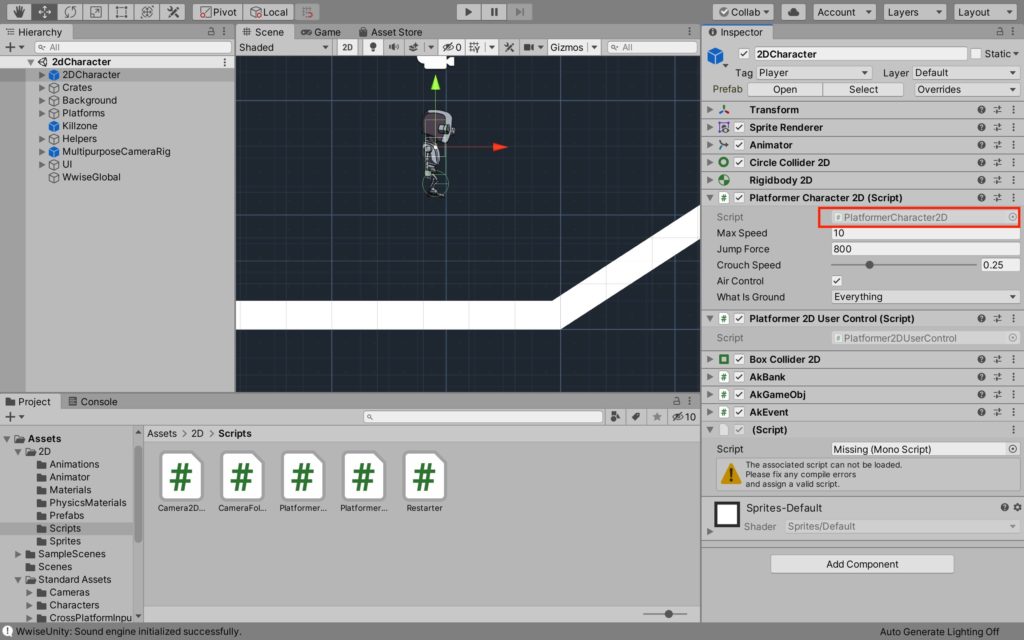
下の方のこの部分になります。
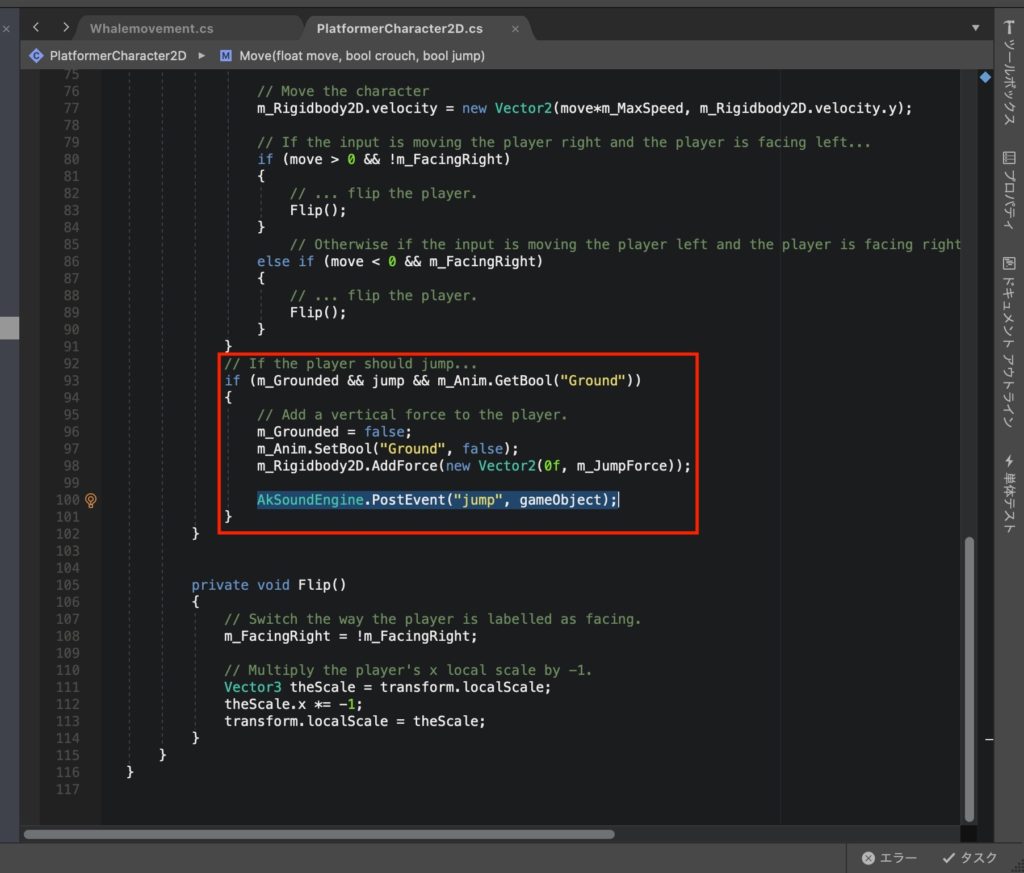
この93行目のif文の中に以下のコードを入れるとEventを発生させることができます。
AkSoundEngine.PostEvent("jump", gameObject);PostEventの後ろの1つ目の文字列がEventの名前、2つ目の文字列が対象となるゲームオブジェクトです。今回はこのスクリプト自体がアタッチされているゲームオブジェクト(操作キャラ)が対象ですので、単純に「gameObject」で問題ありません。
めんどくさければ全部削除して以下のコードを丸ごとコピペしてください。
using System;
using UnityEngine;

namespace UnityStandardAssets._2D
{
    public class PlatformerCharacter2D : MonoBehaviour
    {
        [SerializeField] private float m_MaxSpeed = 10f;                    // The fastest the player can travel in the x axis.
        [SerializeField] private float m_JumpForce = 400f;                  // Amount of force added when the player jumps.
        [Range(0, 1)] [SerializeField] private float m_CrouchSpeed = .36f;  // Amount of maxSpeed applied to crouching movement. 1 = 100%
        [SerializeField] private bool m_AirControl = false;                 // Whether or not a player can steer while jumping;
        [SerializeField] private LayerMask m_WhatIsGround;                  // A mask determining what is ground to the character

        private Transform m_GroundCheck;    // A position marking where to check if the player is grounded.
        const float k_GroundedRadius = .2f; // Radius of the overlap circle to determine if grounded
        private bool m_Grounded;            // Whether or not the player is grounded.
        private Transform m_CeilingCheck;   // A position marking where to check for ceilings
        const float k_CeilingRadius = .01f; // Radius of the overlap circle to determine if the player can stand up
        private Animator m_Anim;            // Reference to the player's animator component.
        private Rigidbody2D m_Rigidbody2D;
        private bool m_FacingRight = true;  // For determining which way the player is currently facing.

        private void Awake()
        {
            // Setting up references.
            m_GroundCheck = transform.Find("GroundCheck");
            m_CeilingCheck = transform.Find("CeilingCheck");
            m_Anim = GetComponent<Animator>();
            m_Rigidbody2D = GetComponent<Rigidbody2D>();
        }


        private void FixedUpdate()
        {
            m_Grounded = false;

            // The player is grounded if a circlecast to the groundcheck position hits anything designated as ground
            // This can be done using layers instead but Sample Assets will not overwrite your project settings.
            Collider2D[] colliders = Physics2D.OverlapCircleAll(m_GroundCheck.position, k_GroundedRadius, m_WhatIsGround);
            for (int i = 0; i < colliders.Length; i++)
            {
                if (colliders[i].gameObject != gameObject)
                    m_Grounded = true;
            }
            m_Anim.SetBool("Ground", m_Grounded);

            // Set the vertical animation
            m_Anim.SetFloat("vSpeed", m_Rigidbody2D.velocity.y);
        }


        public void Move(float move, bool crouch, bool jump)
        {
            // If crouching, check to see if the character can stand up
            if (!crouch && m_Anim.GetBool("Crouch"))
            {
                // If the character has a ceiling preventing them from standing up, keep them crouching
                if (Physics2D.OverlapCircle(m_CeilingCheck.position, k_CeilingRadius, m_WhatIsGround))
                {
                    crouch = true;
                }
            }

            // Set whether or not the character is crouching in the animator
            m_Anim.SetBool("Crouch", crouch);

            //only control the player if grounded or airControl is turned on
            if (m_Grounded || m_AirControl)
            {
                // Reduce the speed if crouching by the crouchSpeed multiplier
                move = (crouch ? move*m_CrouchSpeed : move);

                // The Speed animator parameter is set to the absolute value of the horizontal input.
                m_Anim.SetFloat("Speed", Mathf.Abs(move));

                // Move the character
                m_Rigidbody2D.velocity = new Vector2(move*m_MaxSpeed, m_Rigidbody2D.velocity.y);

                // If the input is moving the player right and the player is facing left...
                if (move > 0 && !m_FacingRight)
                {
                    // ... flip the player.
                    Flip();
                }
                    // Otherwise if the input is moving the player left and the player is facing right...
                else if (move < 0 && m_FacingRight)
                {
                    // ... flip the player.
                    Flip();
                }
            }
            // If the player should jump...
            if (m_Grounded && jump && m_Anim.GetBool("Ground"))
            {
                // Add a vertical force to the player.
                m_Grounded = false;
                m_Anim.SetBool("Ground", false);
                m_Rigidbody2D.AddForce(new Vector2(0f, m_JumpForce));

                AkSoundEngine.PostEvent("jump", gameObject);
            }
        }


        private void Flip()
        {
            // Switch the way the player is labelled as facing.
            m_FacingRight = !m_FacingRight;

            // Multiply the player's x local scale by -1.
            Vector3 theScale = transform.localScale;
            theScale.x *= -1;
            transform.localScale = theScale;
        }
    }
}
書き換えて保存した後にゲームを再生してみましょう。
ジャンプの効果音が再生されるはずです。(^Д^)
補足:もしエラーが出たら
もしかしたらこんな感じのエラーが出る場合があるかもしれません。

導入編でも記しましたがこちらのエラーが出た場合は、こんな感じでProjectウインドウからStandard Asset>2DフォルダをAssetsフォルダ下に移動させておいてください。
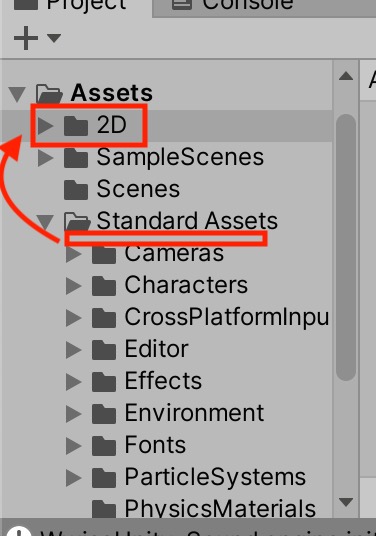
とりあえずエラーは無くなるはずです。
3.効果音実装完了!
無事に再生されましたでしょうか?
効果音1つ実装するのに手間がかかりすぎる、というかこれだけならUnity単体でできるんじゃと思った方もいるかもしれません。
多分できます。(;´Д`)
今回はWwiseの操作に慣れることが目的といった感じでした。Wwiseの真髄はインタラクティブな表現にありますので、次回以降の記事で実装していきたいと思います。
ここまで読んでいただきありがとうございました。
お疲れ様でした!
